
[AdSense-A]When talking to DIY’ers about home improvement projects, one of the hardest jobs that will come to mind is certainly sanding hardwood floors. The war stories about the amount of time, physical labor, and problems that always seem to come up have made many people think otherwise. If you’re considering bringing back the new in your hardwood floors, you’ll be happy to know it’s much easier than it sounds.
The following 10 tips will show you how to sand hardwood floors which is certainly one of the most rewarding DIY projects you will ever do.
10. Plan Much More than a Day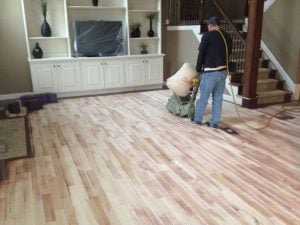
Sanding hardwood floors is a very time consuming job, and one that will take much more than a day. Be sure to set plenty of time aside as the amount of time is dependent on many factors such the size of the project, if you’re currently occupying the space, amount of help and much more. More times than not, you will need days if not weeks to complete.
9. Cover and Mask Around Doors and the Entire Room
Most floor sanders such as a drum or belt sander have an attached vacuum bag, but you will still want to cover and mask around doors and the entire room itself. Floor sanding is an extremely dusty job, and even with the attached vacuum working as it should you can still expect a large amount of sanding dust. Taking the time will minimize the amount of time needed after for cleanup, not to mention the hassle.
8. Be Sure to Buy Three Times the Sandpaper You Think You Need
No matter how much sandpaper you think you need, you can expect to use a whole lot more. There’s nothing more annoying than having to put your project on hold just when you get into it to make a trip to the local hardware store. Buy three times more instead and be sure to save the receipt in case you have to return what you don’t use after.
7. Always Think Safety
It’s so easy to have the “it won’t happen to me” mentality, but the bottom line is that it can. Using any type of power tool can be extremely dangerous, and using a floor sander is one of the most dangerous power tools there is. Consider the room ventilation, safety glasses, ear protection, respirator, loose fitting clothing, and then consider it all over again. In a sense, you can never be too safe…
6. Rent Instead of Buy
Unless you are planning on sanding hardwood floors for a living, then consider renting instead of buying. Floor sanders such as a drum sander can be expensive, and if you are only intending on using it for this one DIY project, then there’s no need to shell out all the money. In most cases, you can expect to save more than 65% if you rent a sander instead of buying one.
5. Check to See if Nails or Staples are Above the Surface of the Floor
While prepping the floor, check to see if there are any old nails or staples raised above the surface of the floor. This can cause you to damage the sander or can result in injury if this is the case. Using a hammer, simply tap the nail or staple down to where it is beneath the surface of the floor.
4. Make Sure Sander is Off When Plugging it In
I can’t tell you how many times I have seen when someone plugged in the sander it just came to life. This happens as the On/Off switch was set to the On position when it was plugged in, and inevitably, the sander only did what it was told.
3. Use a Combination of Sanders
Typically, you will want to use a combination of sanders when sanding hardwood floors. Sand most of the real estate with either a drum sander, belt sander, or an orbital sander, and sand closer to the walls with an edging sander. The edger sander is easier to control manually and won’t damage the walls or trim like the other types of sanders. If using more than one sander, be sure to use the same combination of sandpaper grits for each sander.
2. If a Drum Intimidates You, Go Orbital
You can choose to use more than one type of sander when sanding hardwood floors with the most common being a drum, belt, and orbital sander. Many people are somewhat intimidated with using a drum sander due to its size and power, and for this I would recommend using an orbital sander. It will surely do the job and will give you that same amazing finish, but you’ll want to plan on this being a longer project.
If this is you, don’t worry as there’s nothing wrong with it at all as everyone has their own comfort level.
1. Only Use One Coat of Stain
Now that the sanding is done, only plan on using one coat of stain. Unlike staining other items such as tables, chairs, or metals, using more than one coat will likely cause the color patterns to be inconsistent. This is because the stain is likely to soak into the wood and become more prominent in some locations than others. Not to mention, if staining more than one coat you will have to use an oil based stain and it takes much longer to dry.
[AdSense-A]


