
[AdSense-A]Probably the sander that has the highest potential for injury is the disc sander, but with proper safety measures in place its one that can be used by anyone. Disc sanders operate a lot like belt sanders as it operates under a high rate of speed, power, and will lead to a more complete sanding. One of the most favorite aspects of this type of sander is that it’s stationary unlike other types such as an orbit sander.
Understanding the most practical uses and how to use a disc sander will give you the best results. Perfect for sanding a wide array of materials such as wood, plastic, aluminum, and many others, it’s become a favorite due to its sheer power and efficiency. Many people will use the disc sander in conjunction with many others such as a belt sander depending on the accessibility and size of the job.
Below, we have detailed how to use a disc sander gives you all the ins and outs from the pros.
Prepare the Immediate Area and Gather Materials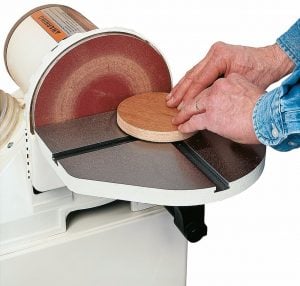
Considering such things as proper ventilation and having everything you’re going to need within reach will save you a great deal of time and frustration. Disc sanders are stationary such as on a desk, and choosing this location where it can become a permanent fixture will save you from having to move later. Make sure there is ample space within the immediate area for the size of material which is being sanded which will minimize obstacles.
Choosing a location which is well ventilated will help minimize having to breathe in any particles. Even after your finished sanding these particles can still be airborne, and breathing them in can become hazardous to your health. Also, creating a plastic barrier can easily be done by placing plastic around the immediate area which will help make cleanup easier and keep the dust from spreading to other areas.
Set Up the Sander and Prepare the Material
Disc sanders come in a wide array of sizes, and depending on the specific model many have many different features as well. Understanding what exactly you’re intending as the degree of features you’ll be using will have to be set up prior to use.
Setting up the sander based while considering the table tilt, miter gauge angle, rip fence, saw guard, and any other accessories such as a hose for dust collection. Also, this is the time to prep the material being sanded as well as such as making and making measurements.
Think Safety First
First and foremost, think safety. As is the case with most safety equipment, be sure to gather and wear all of the proper safety equipment. The disc sander works under a high level of force, so wearing such things as safety goggles, mask, and gloves will naturally provide you the greatest level of protection.
Also, be sure not to wear any loose fitting clothing such as a baggy shirt or an apron. For those with long hair, be sure to tie your hair back and tucking your hair into your shirt is always something to consider.
Turn On and Use the Disc Sander
Now is the time to put your power sander to use. Turn on the sander and wait until the disc reaches full speed before sanding. The disc itself moves in a counterclockwise motion so use the entire disc for larger material or the left side of the disc for smaller material.
While using the sander be sure to keep your fingers away from the disc itself. It’s recommended to not place your fingers any closer to the sanding disc than 4 inches and always, and I mean always keep tabs where your fingers are at all times. This may seem like common sense, but you may be surprised how many unintentional and avoidable accidents occur each year because of this.
With the sander on, carefully push the material closer to the disk on the side you want sanded. Exert a natural level of force as you never want to use too much force when using any power tool as the tool itself should be doing the majority of the work. When the material makes contact with the rotating disc, move it from left to right being sure to keep the material moving at all times. If not moving the material in a constant fashion, you may notice a blackened color where its being sanded due to friction being caused.
No On the Fly Adjustments, Be Sure to Power Off and Unplug the Sander
While sanding, it may be necessary to make adjustments such as the miter gauge angle, depth, or tilt. Be sure to always power off the sander and unplug before making any adjustments. No adjustments should be made while the sanding disc is on and still in motion as this too is a very unsafe practice.
Ultimately, finishing your project is what you’re trying to achieve, but if you do so in an unsafe manner it may inevitably cause a very unfortunate, and avoidable incident.
[AdSense-A]


