
[AdSense-A]Odds are you don’t exactly have a drum floor sander lying around the garage, but if you’re planning on resurfacing your hardwood floors it’ll definitely be something you’ll want to get. There comes a time when your floors need to be resurfaced as it’s easily become one of the most rewarding home renovation projects. On the other side, it can become one of the most dangerous projects if not done properly.
Drum floor sanders offer the perfect complement to hardwood floors as it can easily bring out the very best in the worst appearances of hardwood floors. To save you a great deal of money on your next renovation project, resurfacing instead of replacing may be the way to go.
The following is a step by step guide on How to Use a Drum Floor Sander for Resurfacing Hardwood Floors to give a great, new look.
Consider Renting Instead of Buying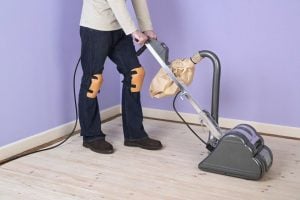
Unless you plan on resurfacing more than your own hardwood floors, renting is definitely the better option. For those who do this for a living, buying a drum floor sander will be a formidable option if you intend on getting your money’s worth. This type of sander can be quite expensive and for most it would definitely not be worth buying. The internet is the best place to locate a drum sander near you as it’s not exactly the most common tool in the house.
Gather All Necessary Equipment
Be sure to consider everything you will need at the same time. If your renting the sander, odds are you’ll only have it for a period of time so minimizing any unnecessary trips to the hardware store will save money in the long run. Sandpaper for drum sanders are not interchangeable with other sanders. You’ll need all grits of sandpaper being sure to purchase every grade of coarse to fine.
Understand How to Put the Sandpaper on Without Trial and Error
Putting sandpaper on a drum sander is unlike other types of sanders. If you’re renting, ask the clerk to demo putting the paper on as this will probably be your best chance to understand. Trial by error is good, but buying sandpaper to only throw it away will prove to be costly in the end.
Gather and Done Safety Equipment
As is the case with all power equipment, gather and done all safety equipment prior to operation. Simple things like safety googles, ear protection, and a mask will help minimize preventable injuries. Drum sanders do come with a dust bag attached, but this doesn’t eliminate all the dust, only the majority. Such equipment is relatively cheap and will have huge health benefits if used, and used properly.
Time to Use the Sander
After following all the necessary steps above, it’s finally time to use the sander. Remember that the sander is heavy, large, and takes a good mix of flow and precision to use. Using the sander doesn’t take the strongest person in the world, in fact, strength doesn’t really matter at all.
Allow the sander to do all the work as you’ll be pulling the sander in the opposite motion of the revolving drum itself. The weight of the sander will provide all the pressure needed, so it’s not necessary to force. Instead, allow the sander to be more natural as the pulling force of you should be more than a guide rather than a physical force.
When using, be sure to avoid getting too close to walls, doors, and baseboards as the force and weight of the sander can cause damage. Always sand with the grain of the wood as sanding against the grain can cause scratches and other blemishes.
Move From Coarse to Fine
For most hardwood floors, it should only take a couple of passes with each sandpaper grit to get the desired results. For rougher floors or floors that need a little extra TLC, four or five passes may be indicated.
Be sure to move from coarse to fine being sure to not skip any grit of sandpaper throughout the process. Starting out with a 60 or 80 grit paper while moving through medium, fine, and extra fine sandpaper will give you the hardwood floors that will help replace the old, with something entirely new.
[AdSense-A]


