
[AdSense-A]If you’re one of the many contemplating the idea of floor sanding with a drum sander, but are reluctant to at the same time, then you’ll want to continue reading. Sanding floors is one of the biggest DIY home improvement projects, and one that will not only save you a great deal of money, but it definitely won’t come easy. Some say it’s one of the most difficult home DIY projects, but with a full understanding on how to use a floor drum sander it’s much easier than you’ve probably heard.
Before looking at what to do, it’s best to understand what kind of sander you’ll need first. The choice is literally yours as there’s more than one type of sander you can use when sanding floors. Drum sanders are definitely the most popular choice, and for all the right reasons including speed, power, and the amount of time you’ll save versus using something much smaller and compact such as an orbital sander.
After choosing your sander, you can follow the steps below which will help you understand how to use a floor drum sander and necessary steps to take before sanding.
Choosing the Right Floor Drum Sander and Consider Renting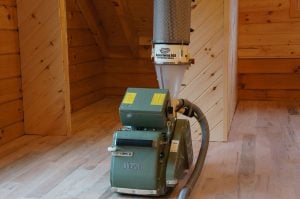
Like we discussed above, the first step to consider would be which type of sander. Drum sanders offer the best option, but understand they are much bigger, more difficult to use, and are very intimidating for many. They do provide a considerable amount of time savings when looking at other choices such as a belt or orbital sander. Drum sanders are great for large jobs or floors that need a whole lot of TLC. For smaller projects, many times a belt or orbital sander will do the job.
If this will be your only use, considering renting instead of buying a sander may be the best option. For instance, a drum sander isn’t exactly your everyday sander and can be quite expensive. On the other the cost of a belt or orbital sander is much cheaper and can be used for most other DIY sanding projects. These types of sanders will be great to own due to their versatility, unlike drum sanders which have a singular purpose for sanding.
Buy and Gather Equipment
For starters, make sure you have plenty of various grits of sand belts. Drum sanders use a sanding belt instead of conventional sand paper, but the idea is still the same. Be sure to buy various grits of belts coarse to fine. I would recommend buying more than you think you need versus what you think you need, as more times than not you’ll run out. Don’t worry; be sure to keep any receipts as you can return any unused sandpaper.
Be sure to consider safety before sanding. Simple safety equipment such as goggles, ear plugs, and respirator should never be overlooked and making sure you’re clothing is not loose is all safety considerations.
Prep the Area
Taking the short amount of time to prep the immediate area will save you a great deal of time when it’s all said and done. Most floor drum sanders come equipped with a vacuum system and bag that accumulates most of the sanding dust, but not all. You’ll find that the residual dust that doesn’t get collected by the vacuum makes one hell of a mess, and something that takes a great deal to cleanup and even more frustration.
Setting Up the Floor Drum Sander – Attaching the Sanding Belt
The sanding belt attaches to the drum sander inside of a door which will be located on the front or side of the sander. Various drum sanders may be slightly different, so it’s a good idea to have someone demo this when you pick up your sander. Whether you are renting or have purchased the sander, have the salesperson or clerk demo putting on a new belt before you leave.
When affixing the belt, make sure the arrows on the belt itself are pointing in the right direction. The arrows should point in the same direction of travel of the drum itself. Once attached, turn on the sander which will activate the tensioner to make sure there is no slack in the belt. Not all drum sanders have a tensioner, and for these, simply slot the belt onto the drum while making sure the arrows are pointing in the right direction.
Most drum sanders that are rented in the UK are slightly different. For these, wrap the sanding belt around the drum and wrap the ends around the metal strip. The metal strip will have screws to loosen and tighten, and after loosening you wrap the belt around the strip and then secure by tightening the screw(s). Again, make sure there’s no slack in the belt, and if there is, simply unscrew, pull the belt tighter, and screw again.
Turn on the Sander
For most drum sanders this is a foregone conclusion as there will be a green button to turn “On” and red button to turn “Off”. Some drum sanders have a different button system, so consulting the specific manufacturer’s directions or salesperson where you rented or bought the sander may be indicated.
Sand Opposite, Lightly, and With the Grain of the Wood
When sanding, sand in the opposite direction as the motion of the drum itself. To simplify things, you’ll be pulling instead of pushing being sure to sand lightly and with the grain of the wood. Drum sanders exert enough force on their own, so exerting or pushing down will not be indicated.
Picture you’re self mowing a lawn with a push mower. You’ll want to sand in straight lines while overlapping each line in the same progression. After a pass or two over the same area, stop to change the sanding belt to a finer grit and be sure to empty the vacuum bag frequently.
For an in-depth video, check out the in-depth tutorial below.


