
Using a belt sander is probably the most fun you’ll ever have while using a sander. The sheer power and ability to transform something so quick makes it a top choice for those looking to strip in no time at all. While belt sanders aren’t exactly a must have for DIY enthusiasts, it is for those looking to tackle some of the biggest jobs in or around the house.
Aside from two handed operation, a belt sander is a great tool for rounding corners and unique shapes and angles. Using a vice, the sander can be secured which allows you to use both hands and maneuver wood or another form of material allowing you to use it as a stationary sander.
Belt sanders are not meant to be the sole sander used on any project. They should be used in conjunction with other sanders such as an orbital or palm sander as this is merely used in the first step in the sanding process.
Below, we have detailed just How to Use a Belt Sander including everything you want to know straight from the pros.
Purchase Everything You Need Before You Need it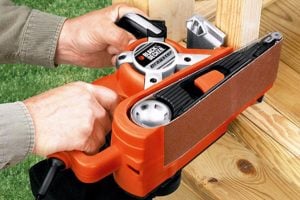
Understanding what you need before you actually need it will save a great deal of time and frustration. There’s nothing more frustrating than having to stop any home project to have to run to the local hardware store only to resume hours later.
This is the time to understand and purchase your sanding belts. Belt sanders don’t use conventional sandpaper, but instead use sanding belts which come in various grits. You may want to purchase both 80 grit sanding belt for starters and a 120 grit belt for finishing. Various belt sanders have differing widths which also correspond with the size of the belt.
Other things to consider are any safety equipment such as googles, ear plugs, gloves, and a mask. We’ll discuss more on belt sander safety in a moment.
Understand What and How You Intend to Use
Belt sanders can be used both as stationary and two handed operation, and knowing precisely what you are wanting to sand will help you decide. Stationary use is best adapted for sanding curves and other angles or shapes. This is done simply by using a vice attached to a table, and securing the sander belt-up.
Two-handed operation is better adapted for sanding in more of a straight line or following a plane. This is typically used for larger projects while stationary sanding is typically used for sanding smaller materials.
Prepare the Area and Secure Equipment
This is the time when you prepare the immediate area, assure you have an ample amount of room, and make sure your equipment is where you want, and need it to be. Create a barrier around the immediate area which will help contain sander dust using plastic, work in a ventilated area, and make sure you have plenty of room to operate freely. If using a vice for stationary belt sanding, make sure it is secure to the workbench and there is enough room in all directions free from any objects.
Done and Properly Wear Safety Equipment
This is the most important step not just while using a belt sander, but any piece of power equipment. Safety equipment such as googles, ear protection, and a mask should never be overlooked even for the professional at heart. Make sure that all loose clothing is secure and any long hair is pulled back.
Operate the Belt Sander
Belt sanders are one of the most powerful pieces of equipment you will use during any project. The aggressive nature, speed, and sheer force is what makes it so popular and understanding precisely how to use it will give you the best results. After turning the sander on, the following will give you more insight on both two-handed operation and stationary sanding.
Two Handed Operation
Be sure to wait until the belt is full engaged and at full speed. While doing so, one hand should be on the handle which provides stability while the other hand operates the trigger, and both hands should remain in the same spot throughout use.
Easing the sander down onto the material being sanded, the rear of the sander should make contact first before easing the sander down completely. Naturally, the movement of the belt will cause the sander to move forward on its own over the surface, so be sure to have a good grip at all times.
Gently move the sander over the material being sure to always move with the grain of the wood, and never keep the sander stationary for long as it may cause undesired divots or blemishes. Due to the speed and sheer power, the amount of time it takes to remove a great deal of surface material won’t be long at all.
Stationary Sanding
Stationary sanding is perfect for those looking to form angles and other shapes, but isn’t exactly the most precise sanding method. If you’re looking for exact measurements, it may be difficult to achieve for many beginners.
Using a vice attached to a workbench, the belt sander is placed in an upright position and secured. The trigger is then moved to the “On” position which then allows you to move the material freely allowing you to maneuver, and create your desired shape.
Coarse to Less Coarse
Belt sanders won’t give you that baby soft feeling like other sanders such as an orbital palm sander, but you it’s still recommended to switch grits. For differing grits, sanding belts are used with this type of sander instead of conventional sandpaper. You won’t find fine numbered grit as belt sanders are used solely for coarse sanding rather than fine sanding.
Changing the sanding belt from coarse to less coarse starting with an 80 grit and ending with a 120 grit sanding belt should due to the trick. The methodology is the same as sandpaper as the time with each belt will be determined by the specific project, sander, and the effect you’re looking for.


